• Translated
  • fr-FR
  • ja-JP
  • de-DE
  • it-IT

Fly Tying Group
Fly of the Month

 Myakka Minnow


Fly of the Month

We're glad you're here. You're in the right place if you want to improve your fly tying skills or learn to tie a new fly. If you find this information valuable please support our work by joining FFI and the Fly Tying Group. You may want to connect with another fly tier.  If so, use the button below to search our directory.

Find a Fly TierJoin FFI


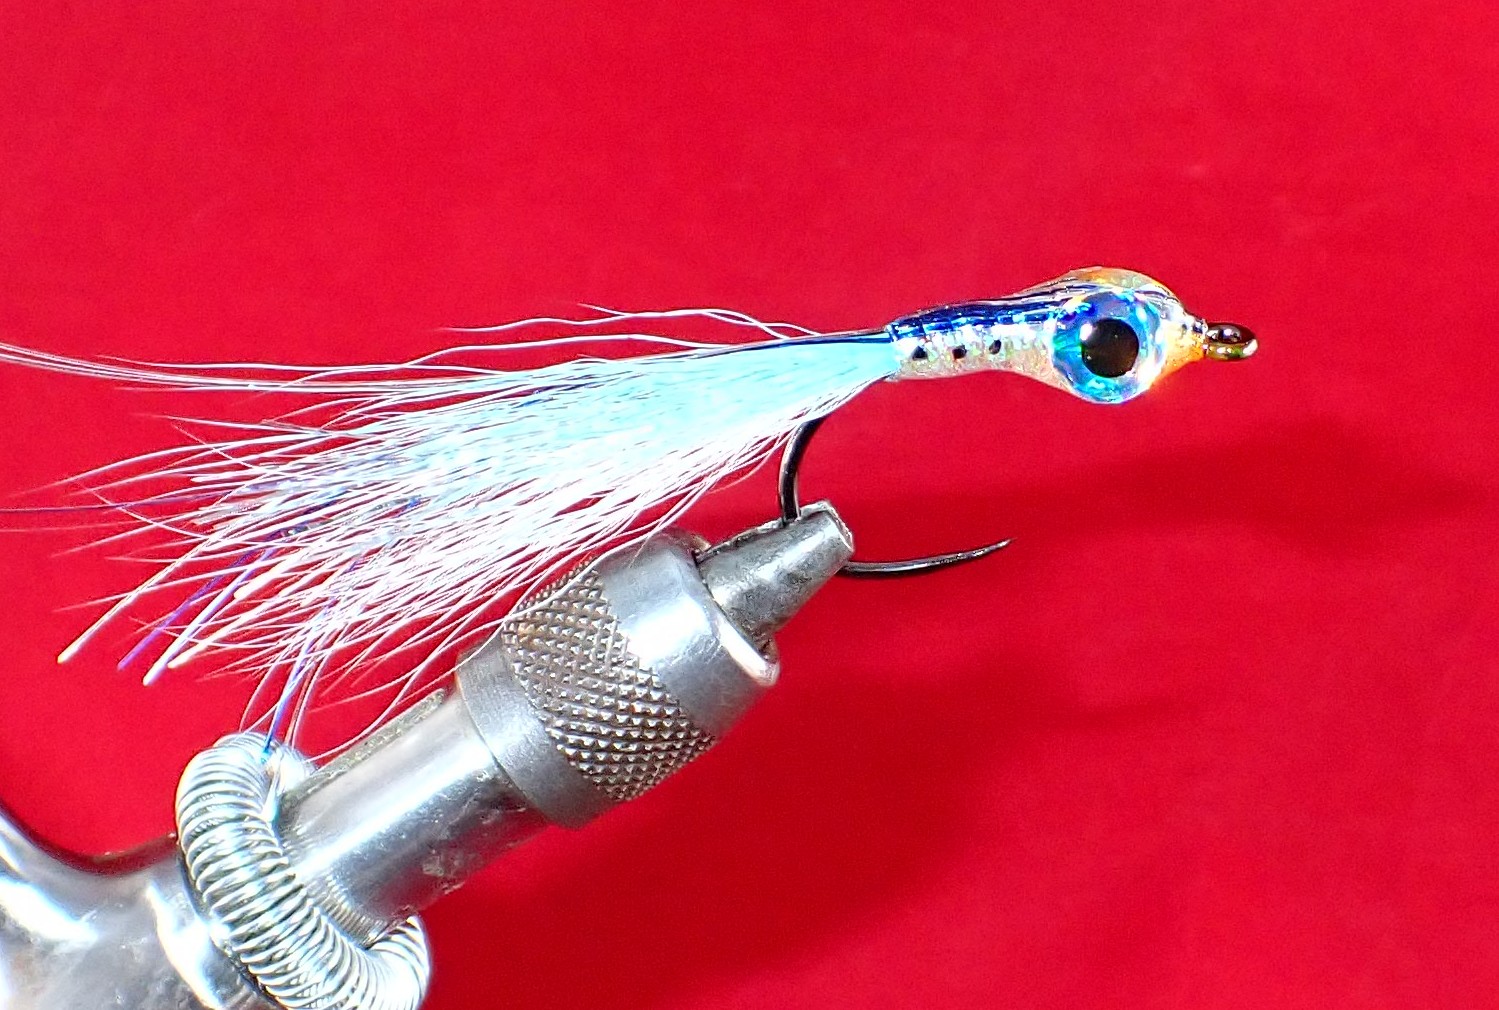
Myakka Minnow


Edition: November, 2026

Written by: Mike Cline

Photographed By: Mike Cline

Fly Creator: Steve Gibson

The Myakka River flows approximately 72 miles southwest from the prairies of Central Florida to Charlotte Harbor on the Florida Gulf Coast. By all accounts this National Wild and Scenic River provides some pretty good fishing for bass and other warm water species in its freshwater sections and excellent Snook fishing in the lower estuarial waters. The Myakka is within easy reach of Sarasota anglers and one of the favorite freshwater destinations for Sarasota guide Steve Gibson. Steve tells the story of the genesis of his Myakka Minnow after a frustrating day on the Myakka in 2005.

Gibby's Myakka Minnow

The Mighty Myakka Minnow was born out of frustration. I’m sure you’ve been there. Imagine a day on the water with fish busting minnows throughout the morning. But after several hours, you still have nothing to show for your efforts. You cast into the spray of minnows, but your offerings are ignored repeatedly. The fish are so keyed into the tiny minnows that they ignore everything else. Although the scenery is nice and weather gorgeous, it sure would be nice to feel the tug of a largemouth bass or hand-sized bluegill. This happened to me several times while fly fishing on the Myakka River near my home in Sarasota, Fla.  After one unproductive outing, I decided to try and come up with a fly which would imitate the minnows the fish were so excited about. I knew that the fly had to be no more than an inch long. It had to look like a minnow. It had to sink. It had to have large eyes. After a few hours of trial and tribulation, I came up with a workable prototype and couldn’t wait to give it a try. Next time out to the river, I had several Myakka Minnows in my box and one tied on my 4-weight fly rod. It didn’t take long to realize that I’d hit a home run. I picked up bass, bluegill, stumpknocker and tilapia while blind casting. I kept my eyes open for scattering minnows. When I saw fish attacking minnows, I’d cast the Myakka Minnow into the fray.

Since the creation of the Myakka Minnow, the design has been adapted to all manner of freshwater and saltwater species with great success.  More importantly, it is an incredibly simple fly to tie. The original pattern is still viable today.

Saltwater versions are extremely effective in deep inshore potholes and channels fished on a sink tip line.

Download PDF Version


MATERIALS

Hook: Firehole 801P 1/0 (Any appropriately sized SW hook works)

Thread: Mono 0.10

Tailing: Bucktail (Any synthetic streamer fiber or flash, silicon legs, marabou or hackle works)

Body: Flat braid

Topping: Flash or flat braid

Eyes: 3D eyes

Coloration (optional): Alcohol marker

Coating: UV resin and head cement


Tying Steps:

The Myakka Minnow is best tied with a full rotary vise and bobbin hanger.

Color scheme is at the discretion of the tier, material availability and target species.


Step 1. Create a thread base from the hook bend to approximately 1/8” behind the hook eye.  Finish with the thread 1/8” behind the hook eye.


Step 2. Select a modest clump of bucktail.  The bucktail will be tied in on top of the hook shank at the 1/8” behind the hook eye point and should extend approximately 1 to 1.5 times the hook shank length beyond the hook bend.  Trim bucktail butts accordingly.  A similar approach should be used for synthetics, marabou or hackle.


Step 3. Add a few strands of flash on top of the first clump of bucktail.


Step 4. Add another sparse clump of bucktail on top of the hook shank similar to step 2.


Step 5. Tie in the topping material facing backwards on top of the bucktail at the hook bend.


Step 6. Tie in a generous length of flat braid at the hook bend and bring the thread forward to the hook eye.  Secure with two double half-hitches and position the thread over the bobbin holder.


Step 7. Slowly rotate the vise while holding the flat braid tight.  Create tight, slightly overlapping wraps up to the hook eye.  Repeat going back toward the hook bend about two thirds of shank length.  Repeat several times gradually increasing the diameter of the body braid near the front of the hook.  Carefully move the thread behind the braid and take several tight wraps from the thickest part of the body to the hook eye, ensuring the braid is securely attached.  Trim the braid end.


Step 8. Pull the topping material forward to the hook eye, secure with a couple of tight wraps.  Pull the topping material tight ensuring it is well positioned on top of the fly.  Pull the remaining topping material tight back toward the hook bend and secure with thread wraps from the hook bend to the hook eye.  Finish with two double half-hitches at the hook eye.  Trim the topping material to align with the end of the tailing material.

To prevent the thread wraps from loosening and possibly causing the braid or topping to unravel when the thread is trimmed it is useful to apply a thin coat of UV resin over the front 1/4” of the fly before trimming the mono thread.  Additionally, if using alcohol markers to add color to the fly, it covers better and doesn’t run into the braid if the braid is first sealed with a very thin coat of UV resin.

Trim the mono thread.


Step 9. To add the 3D eyes, rotate the vise 90 degrees and tighten.  Place a small dollop of UV resin at the head of the fly where you intend to place the eyes.  Center the eye over the UV resin and cure enough to tack the eye in place.


Step 10. Rotate the vise 180 degrees and repeat the process ensuring the two eyes are aligned.


Step 11. Add and cure UV resin in sparse amounts to prevent running.  Start with the gaps between the eyes on top and bottom of the fly.  Then apply and cure resin to the top, side and bottom of the fly.  If the resin starts to run continually rotate the vise to level the resin and continue to rotate while curing.  At the head of the fly ensure a thin coat of resin covers the eyes and the joints between the eyes and body.  Ensure a thin coat of resin covers the fly at the head just behind the hook eye.  It is very important to make sure there is no resin filling the hook eye when curing.


Step 12. Once all the resin is cured, coat the fly with a thin coat of your favorite head cement.


Editors Notes: Comments from the editor.

Please note: The demonstration you are viewing makes no claim, implied or otherwise, that the presenter or demonstrator of the fly pattern was the original creator of the fly. This is the guest tier's version of this fly and it may differ from the creator's or other versions and variations.

Please Credit FFI Website or FFI Fly Tying Group Fly of the Month with any use of the pattern. You can direct any questions or comments to FOM.FTG@Gmail.com.

Call for Fly of the Month Submissions! 

Do you know someone who you think should be featured in the Fly of the Month? If so, feel free to refer them. If you have a camera and computer, you can write a Fly of the Month article about any fly you'd like. For details contact the Fly Tying Group at FOM.FTG@Gmail.com.

Download Submission Guide