• Translated
  • fr-FR
  • ja-JP
  • de-DE
  • it-IT

Fly Tying Group
Fly of the Month

 Mulpin


Fly of the Month

We're glad you're here. You're in the right place if you want to improve your fly tying skills or learn to tie a new fly. If you find this information valuable please support our work by joining FFI and the Fly Tying Group. You may want to connect with another fly tier.  If so, use the button below to search our directory.

Find a Fly TierJoin FFI


Mulpin


Edition: May, 2026

Written by: Dutch Baughman

Photographed By: Dutch Baughman

Creator: Dutch Baughman

The plan was to design a fly pattern that would be compatible with the rivers in the Missoula, Montana area that seem to have plenty of sculpin. So after tying the Sculpzilla fly pattern and Johnson’s Creek Leech fly pattern, my concept evolved to the Mulpin fly pattern. 

I thought the fly pattern should be called the Missoula Sculpin, but after fly fishing with my friend, Adam Spenner who is a fly fishing Guide in Missoula, for 30 years, I have learned how he reacts to a new pattern.  Last year I showed Adam my creation called the Stone Hopper, and immediately after telling Adam the name, he instantly called the new fly pattern The Stopper. So I knew if I showed this fly pattern to Adam and called it the Missoula Sculpin, he would instantly call this pattern the Mulpin. So, this fly pattern is called the Mulpin.

This pattern is dressed to ride hook point up.

Download PDF Version


MATERIALS

Hook: Gamakatsu B10S Stinger, size 6 to 10.  Gamakatsu, SL11-3H is a tin plated saltwater hook.

Tail: Rabbit strip or pine squirrel strip (for smaller hook sizes)

Thread: Black

Body: 12 wraps of wire on the hook shank starting at the start of the bend; hook chartreuse polar chenille (or Veevus Body Fuzz)

Legs: Orange Perfect (brand) rubber legs, orange and black (1) at the start of the bend and (2) at mid-body

Hackle: CDL Schlappen Pack Pardo over Guinea or Galena


Step 1. Lay a thread base of spiral wraps from the start of the bend to the middle of the hook shank.


Step 2. Make 12 wire wraps from the start of the bend toward the hook eye.


Step 3. Attach rubber legs (1”) ) at the third wire wrap. Fold the rubber leg around the tying thread so the tips are even. Raise the tying thread above the hook shank, lower the rubber leg on to the hook shank, make one thread wrap between the 2nd and 3rd wire wrap. Make holding wraps over the rubber legs, then a holding wrap around the rubber legs at the start of the bend (on hook not wire wraps).


Step 4. Fold a rubber leg around the tying thread so the tips are even. Raise the tying thread above the hook shank, lower the rubber leg on to the hook shank, make one thread wrap between the 1st and 2nd wire wraps. Make holding wraps over the rubber legs.


Step 5. Tie in Veevus Body Fuzz at the start of the bend and wrap toward eye.  Cover the wire wraps. Place a half hitch or whip finish next to the last wire wrap.


Step 6. Be sure to leave ¼” between the wire wraps and the hook eye.


Step 7. Invert hook, measure the rabbit strip to have one piece as long as the width of the wire wraps; the tail length is 1”.


Step 8. Press rabbit strip on to hook point.  The short length of rabbit strip is above the hook point; the longer tail length is below the hook shank. Note: the rabbit strip leather strip goes over the hook point, not the rabbit strip hair side. Take the hook out of the vise and slide the rabbit strip around the hook bend.


Step 9. After sliding the rabbit strip around the hook bend, rotate the rabbit strip so the shorter length is toward the hook eye.


Step 10. The rabbit strip should cover the width of the wire wraps and the tying thread attaches the rabbit strip to the hook shank next to the last wire wrap.


Step 11. Tie-in a Guinea hackle.


Step 12. Tie in a CDL Schlappen hackle and wrap toward the hook eye. After the last hackle wrap strip feather barbs from the rachis.


Step 13. Wrap the tying thread around the hackle feather rachis in a clockwise direction.


Step 14. Relax the tension on the hackle feather, and raise the tying thread as you make a holding wrap then a tightening wrap.


Step 15. Cut the hackle rachis. Form a small head. Whip finish.


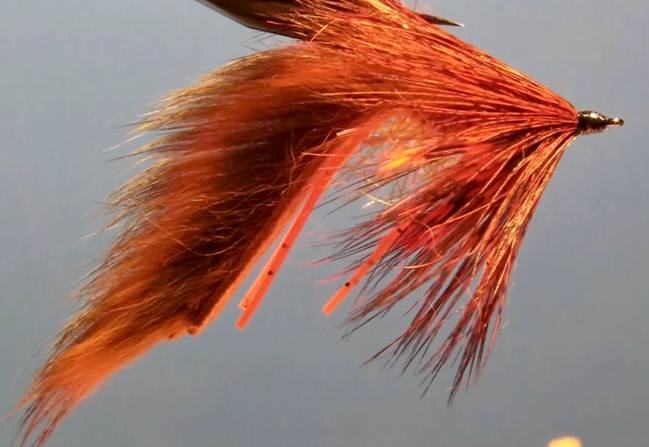
Step 16. The Mulpin.


Step 17. The Grant Mulpin (or Gulpin).

A Mulpin with a woven hair hackle.


Editors Notes: Comments from the editor.

Please note: The demonstration you are viewing makes no claim, implied or otherwise, that the presenter or demonstrator of the fly pattern was the original creator of the fly. This is the guest tier's version of this fly and it may differ from the creator's or other versions and variations.

Please Credit FFI Website or FFI Fly Tying Group Fly of the Month with any use of the pattern. You can direct any questions or comments to FOM.FTG@Gmail.com.

Call for Fly of the Month Submissions! 

Do you know someone who you think should be featured in the Fly of the Month? If so, feel free to refer them. If you have a camera and computer, you can write a Fly of the Month article about any fly you'd like. For details contact the Fly Tying Group at FOM.FTG@Gmail.com.